Interface Overview
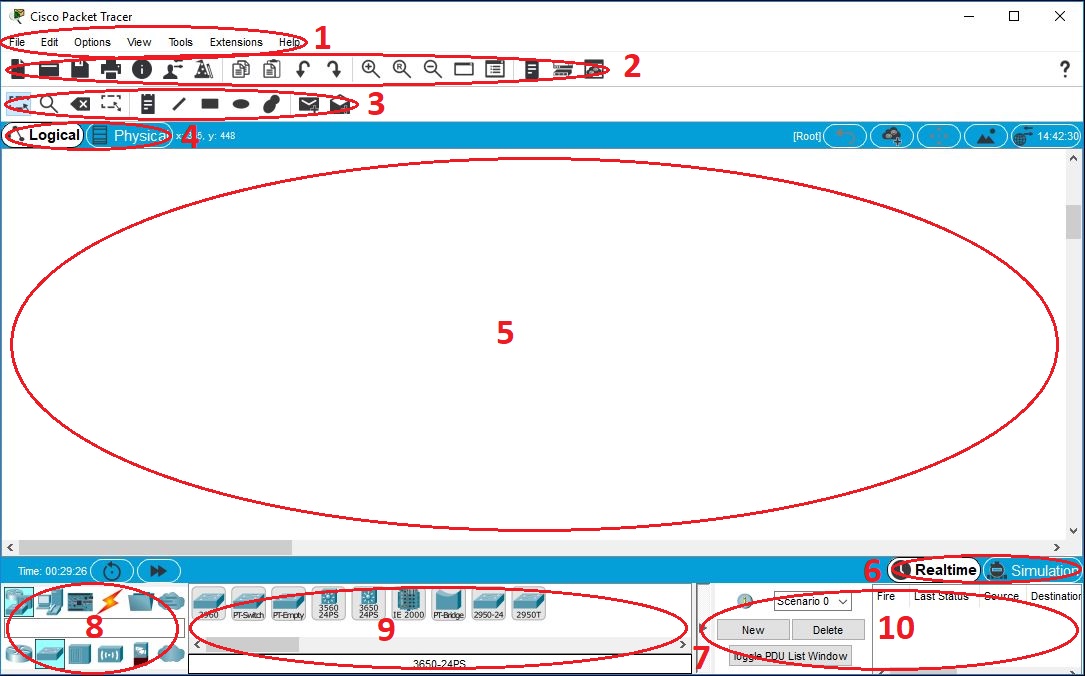
When you open Packet Tracer, by default you will be presented with the following interface:

This initial interface contains ten components. If you are unsure of what a particular interface item does, move your mouse over the item and a help balloon will explain the item.
| 1 | Menu Bar | This bar provides the File, Edit, Options, View, Tools, Extensions, and Help menus. You will find basic commands such as Open, Save, Save as Pkz, Print, and Settings and Preferences in these menus. You will also be able to access the Activity Wizard from the Extensions menu. |
| 2 | Main Tool Bar | This bar provides shortcut icons to most commonly used menu commands. |
| 3 | Common Tools Bar | This bar provides access to these commonly used workspace tools: Select, Inspect, Delete, Resize Shape, Place Note, Drawing Palette, Add Simple PDU, and Add Complex PDU. See "Workspace Basics" for more information. |
| 4 | Logical/Physical Workspace and Navigation Bar | You can toggle between the Physical Workspace and the Logical Workspace with the tabs on this bar. In Logical Workspace, this bar also allows you to go back to a previous level in a cluster, create a New Cluster, Move Object, Set Tiled Background, and Viewport. In Physical Workspace, this bar allows you to navigate through physical locations, create a New City, create a New Building, create a New Closet, Move Object, apply a Grid to the background, Set Background, and go to the Working Closet. |
| 5 | Workspace | This area is where you will create your network, watch simulations, and view many kinds of information and statistics. |
| 6 | Realtime/Simulation Bar | You can toggle between Realtime Mode and Simulation Mode with the tabs on this bar. This bar also provides buttons to Power Cycle Devices and Fast Forward Time as well as the Play Control buttons and the Event List toggle button in Simulation Mode. Also, it contains a clock that displays the relative Time in Realtime Mode and Simulation Mode. |
| 7 | Network Component Box | This box is where you choose devices and connections to put into the workspace. It contains the Device-Type Selection Box and the Device-Specific Selection Box. There's a searchable field that allows you to enter a device name to look for that specific device quickly. Device name shows when you mouse over the device icon in the Device-Specific Box. |
| 8 | Device-Type Selection Box | This box contains the type of devices and connections available in Packet Tracer. The Device-Specific Selection Box will change depending on which type of device you choose. |
| 9 | Device-Specific Selection Box | This box is where you choose specifically which devices you want to put in your network and which connections to make. In this box, you'll find devices that may have already been obsolete. You have an option to hide legacy equipment in the Preferences window under Options. |
| 10 | User Created Packet Window* | This window manages the packets you put in the network during simulation scenarios. See the "Simulation Mode" section for more details. |
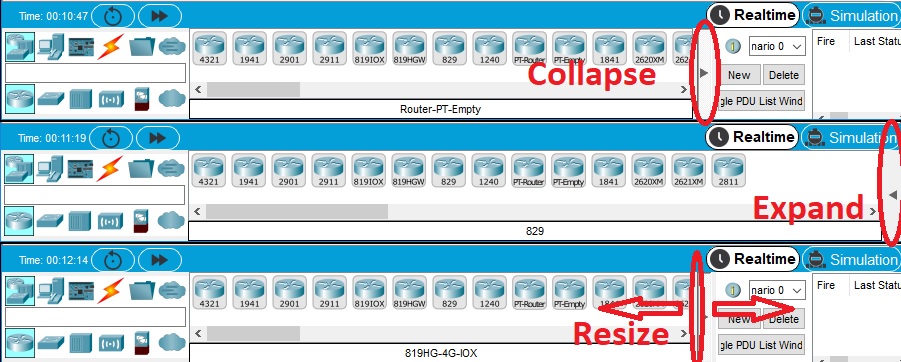
| * You can completely hide the User Created Packet Window (UCPW) by clicking on the expand/collapse button. You can also freely resize UCPW by placing the cursor near the left edge of the window (it will turn into a "resize" cursor) and then dragging the cursor left or right. |

Workspaces and Modes
Packet Tracer has two workspaces (Logical and Physical) and two modes (Realtime and Simulation). Upon startup, you are in the Logical Workspace in Realtime Mode. You can build your network and see it run in real time in this configuration. You can switch to Simulation Mode to run controlled networking scenarios. You can also switch to the Physical Workspace to arrange the physical aspects (such as the location) of your devices.
Saving a PKZ
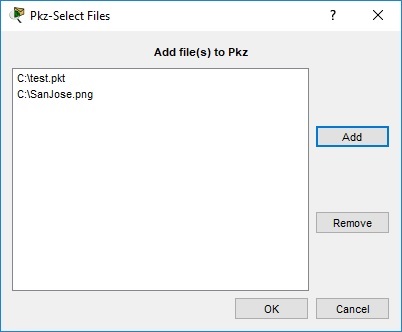
Packet Tracer allows you to save your topology (PKT) as well as any custom device icons and backgrounds that you applied to on the Logical Workspace and Physical Workspace to a save file called a PKZ. A PKZ is able to retain any external files you add in a single save file, which allows for portability and compactness from computer to computer. To create a PKZ, go to File > Save as Pkz. Enter a file name for the PKZ and click on Save. In the Pkz Select Files dialog, you will be able to add and remove files that you want to save along with PKT. To add a file, click on the Add button and browse to the file you want to add then click Open. To remove a file, select the file from the list then click Remove. Once you are done adding and removing files, click OK to create the PKZ file.

Be sure to add all custom device image icons and custom backgrounds. |